
A quick post to cover building up the test lab DNS. Eventually these notes will appear in my test lab build series, but until then, this will give you the gist on how to automate this.
The following code snippets assume that you’ve done the following:
- Deployed a Microsoft Windows 2012R2 Domain Controller called “AD2012-1” on the virtualization platform of your choice
- Have copied the scripts and configuration files to the domain controller
- Set the IP address of the “AD2012-1” DC to reside in the “10.0.0.0/24” subnet
- Installed the AD and DNS Windows Features
- Deployed the AD Domain
So after you initially deploy the AD domain, you’re left with the problem of having no reverse lookup entries in your DNS system. As Frank Denneman pointed out, this really hoses up vCenter deployments with incredibly frustrating problems. I can also say this can hose up quite a lot of MS applications as well. So the moral of the story is script this out and run it in your lab prep package so you don’t have to care (much).
Here’s the PowerShell snippet to cover the relevant portion:
## Configure DNS

# Add the Reverse Lookup Zone for 10.0.0.0/24 (10.0.0.0 - 10.0.0.255) and 10.0.1.0/24 (10.0.1.0 - 10.0.1.255)"

$NetworkIDs = @("10.0.0.0/24","10.0.1.0/24")

foreach($NetID in $NetworkIDs)
{
 Add-DnsServerPrimaryZone -NetworkId $NetID -ReplicationScope Forest
}


## Configure Active Directory Sites

<#

Site Definitions:

Site 1: Alpha IP Range: 10.0.0.0/24
Site 2: Beta IP Range: 10.0.1.0/24


# Site Configuration File Format Example:

 SiteName,SiteRange,SiteDescription
"Alpha","10.0.0.0/24","Test Site 1 - Alpha"
"Bravo","10.0.1.0/24","Test Site 2 - Bravo"

#>

## Create the Sites for the Test Lab

# Import the Config Data from the CSV

$ConfigData = Import-Csv -Path '.\2.3 - AD Site Config Data.csv'

foreach($Site in $ConfigData)
{
 New-ADReplicationSite -Name $Site.SiteName -Description $Site.SiteDescription
 New-ADReplicationSubnet -Name $Site.SiteRange -Site $Site.SiteName -Description $Site.SiteDescription
}

# Set the replication interval to 1 minute

Get-ADReplicationSiteLink -Filter * | Set-ADReplicationSiteLink -ReplicationFrequencyInMinutes 1

# Set the replication change notification to enabled

Get-ADReplicationSiteLink -Filter * | Set-ADReplicationSiteLink -Replace @{'options'=1}

# Move the initial domain controller (AD2012-1) to its new site

$InitialDC = "AD2012-1"
$DestinationSite = "Alpha"

Move-ADDirectoryServer -Identity $InitialDC -Site $DestinationSite


## Add additional DNS entries

# RHEL 7.2 running BIND DNS for DNS testing scenarios

$BINDServerName = 'BIND01'
$ZoneName = "Domain.test"
$BINDIPAddress = '10.0.0.5'

Add-DnsServerResourceRecord -A -CreatePtr -Name $BINDServerName -IPv4Address $BINDIPAddress -ZoneName $ZoneName


## Restart the domain controller to clean things up

Restart-Computer
Keep in mind these are raw and out of the middle of other scripts that time these actions at different points in the build process, so adjust to your scenario, and subscribe for the series that show these in their final form.
After the above, you should end up with something like this:
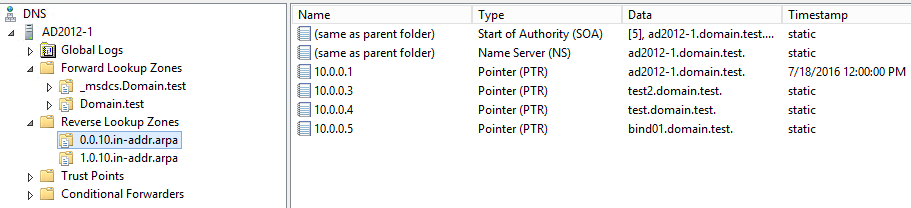
Test Lab DNS Example
