HPE ProLiant Gen10 Server Health Summary / UID Feature

On the HPE ProLiant Gen 10 models with iLO 5, you have a new feature that gives you a health summary when you’re looking at the KVM of a rackmount (side note: I haven’t checked a blade yet w/ the dongle so feel free to check it out sometime and report back) when you press the UID button on the front of the server.  There are some other features of the UID button as well as noted in the CAUTION section.

Here’s the official blip in this doc from HPE (page 319 in the HPE iLO 5 User Guide):

serverhealthclip

So, in case you hit the UID so you can install some cabling, then intend on logging into it…and you run into that screen, momentarily hit the UID to turn it off and you’ll be back to a full-screen view.

Advertisement
Posted in HPE, Management | Tagged , , , | 1 Comment

Quick Tip: PowerShell for Testlab DNS Entries

A quick post to cover building up the test lab DNS. Eventually these notes will appear in my test lab build series, but until then, this will give you the gist on how to automate this.

The following code snippets assume that you’ve done the following:

  • Deployed a Microsoft Windows 2012R2 Domain Controller called “AD2012-1” on the virtualization platform of your choice
  • Have copied the scripts and configuration files to the domain controller
  • Set the IP address of the “AD2012-1” DC to reside in the “10.0.0.0/24” subnet
  • Installed the AD and DNS Windows Features
  • Deployed the AD Domain

So after you initially deploy the AD domain, you’re left with the problem of having no reverse lookup entries in your DNS system.  As Frank Denneman pointed out, this really hoses up vCenter deployments with incredibly frustrating problems.  I can also say this can hose up quite a lot of MS applications as well.  So the moral of the story is script this out and run it in your lab prep package so you don’t have to care (much).

Here’s the PowerShell snippet to cover the relevant portion:

## Configure DNS

# Add the Reverse Lookup Zone for 10.0.0.0/24 (10.0.0.0 - 10.0.0.255) and 10.0.1.0/24 (10.0.1.0 - 10.0.1.255)"

$NetworkIDs = @("10.0.0.0/24","10.0.1.0/24")

foreach($NetID in $NetworkIDs)
{
 Add-DnsServerPrimaryZone -NetworkId $NetID -ReplicationScope Forest
}


## Configure Active Directory Sites

<#

Site Definitions:

Site 1: Alpha IP Range: 10.0.0.0/24
Site 2: Beta IP Range: 10.0.1.0/24


# Site Configuration File Format Example:
 
 SiteName,SiteRange,SiteDescription
"Alpha","10.0.0.0/24","Test Site 1 - Alpha"
"Bravo","10.0.1.0/24","Test Site 2 - Bravo"

#>

## Create the Sites for the Test Lab

# Import the Config Data from the CSV

$ConfigData = Import-Csv -Path '.\2.3 - AD Site Config Data.csv'

foreach($Site in $ConfigData)
{
 New-ADReplicationSite -Name $Site.SiteName -Description $Site.SiteDescription
 New-ADReplicationSubnet -Name $Site.SiteRange -Site $Site.SiteName -Description $Site.SiteDescription
}

# Set the replication interval to 1 minute

Get-ADReplicationSiteLink -Filter * | Set-ADReplicationSiteLink -ReplicationFrequencyInMinutes 1

# Set the replication change notification to enabled

Get-ADReplicationSiteLink -Filter * | Set-ADReplicationSiteLink -Replace @{'options'=1}

# Move the initial domain controller (AD2012-1) to its new site

$InitialDC = "AD2012-1"
$DestinationSite = "Alpha"

Move-ADDirectoryServer -Identity $InitialDC -Site $DestinationSite


## Add additional DNS entries

# RHEL 7.2 running BIND DNS for DNS testing scenarios

$BINDServerName = 'BIND01'
$ZoneName = "Domain.test"
$BINDIPAddress = '10.0.0.5'

Add-DnsServerResourceRecord -A -CreatePtr -Name $BINDServerName -IPv4Address $BINDIPAddress -ZoneName $ZoneName


## Restart the domain controller to clean things up

Restart-Computer

Keep in mind these are raw and out of the middle of other scripts that time these actions at different points in the build process, so adjust to your scenario, and subscribe for the series that show these in their final form.

After the above, you should end up with something like this:

Test Lab DNS Example

Test Lab DNS Example


Posted in Active Directory, Deployment, Powershell, Scripting, Test Lab | Tagged , , , | Leave a comment

File Server Resource Manager Quota Adjustment – Quick and Dirty

DR tests are fun.  Manually flipping file servers w/ Robocopy as the synchronization mechanism is not.  Hurry up, Server 2016, you’re my only hope.

We ended up having to make some quota adjustments on the fly to handle data changes after a DR test, and here’s the quick and dirty script I wrote to adjust them.

I *highly* recommend testing in your environment and also changing it to log changes to a custom PSObject for easy exporting to CSV and easy reporting.  But for me, this afternoon, it worked.

$Quotas = Get-FSRMQuota

$QuotasToMod = @()

foreach($Quota in $Quotas)
{
if($($Quota.Usage) -gt $($Quota.Size * .90))
{
Write-Host "$($Quota.Path)`tCurrent Size:$($Quota.Usage)`tCurrent Limit:$($Quota.Size)"
$QuotasToMod +=$Quota
}
}

Write-Host "Mod count:`t $($QuotasToMod.Count)"

foreach($ToMod in $QuotasToMod)
{
Get-FsrmQuota -Path $($ToMod.Path) | Set-FsrmQuota -Size ($($ToMod.Usage) * 1.2) -SoftLimit:$false
}
Posted in Disaster Recovery, File Services, Powershell, Scripting, Uncategorized | Tagged , , | Leave a comment

Test Lab Build Series – 1 – Planning

The first part of any environment build, be it a test lab, a development platform, or even a production environment, is planning.  Arguably the 2nd most important task in any project is this step, because it is going to guide you along the way.

Step 1, determine what your high level goals are, and make a list of them.  For example:

  • A test lab that I can wipe and rebuild in a very short time frame
  • Cross platform compatibility
  • Services to include:
    • Active Directory
    • DNS
    • DHCP
    • Client Workstations of all supported OS
    • Test Servers of all supported OS
  • Automated and scripted as much as possible so that test work can begin immediately upon completion

Step 2, with our list of goals listed out, we can then proceed with going into finer detail to figure out how to accomplish them.  For example:

  • A test lab that I can wipe and rebuild in a very short time frame
    • This indicates we should probably use virtualization. Physical hardware deployment and configuration is time consuming and inefficient when compared to a virtual environment.
  • Cross platform compatibility
    • Some people prefer VMware, some people prefer Hyper-V. So let’s go ahead and account for both environments since we typically utilize both.
  • Services to include:
    • Active Directory
      • 2 Domain Controllers (helpful for testing/ensuring replication, site specific tests for AD site aware applications, etc.)
    • DNS
      • Internal DNS for handling name resolution and testing DNS processes
    • DHCP
      • Internal DHCP for address handling and ease of server management
    • Client Workstations of all supported OS
      • Windows 7, Windows 8, Windows 10
      • All configured to join the domain (though certainly not required for all test scenarios)
    • Test Servers of all supported OS
      • Windows Server 2012R2
      • All configured to join the domain (though certainly not required for all test scenarios)
    • Automated and scripted as much as possible so that test work can begin immediately upon completion
      • When it comes to processes, as automation usage increases, time efficiency increases while errors decrease.

Step 3, get down to the specifics needed to accomplish everything listed in Step 2.  For example:

  • A test lab that I can wipe and rebuild in a very short time frame
    • This indicates we should probably use virtualization. Physical hardware deployment and configuration is time consuming and inefficient when compared to a virtual environment.
      • Requirements
        • Use a dedicated host or a local workstation depending on the virtualization platform of choice.
  • Cross platform compatibility
    • Some people prefer VMware, some people prefer Hyper-V. So let’s go ahead and account for both environments since we utilize both.
      • Requirements
        • Hyper-V Host: Local Windows 10 Client running Hyper-V Service
        • VMware Host: Dedicated VMware ESXi 6.0 Host
  • Services to include:
    • Active Directory
      • 2 Domain Controllers (helpful for testing/ensuring replication, site specific tests for AD site aware applications, etc.)
        • Requirements
          • Server Names: AD1, AD2
      • DNS
        • Internal DNS for handling name resolution and testing DNS processes
          • Requirements
            • Hosted on AD1, AD2
      • DHCP
        • Internal DHCP for address handling and ease of server management
          • Requirements
            • Hosted on AD1, AD2
      • Client Workstations of all supported OS
        • Windows 7, Windows 8, Windows 10
          • Requirements
            • Client Names: Win7, Win8, Win10
          • All configured to join the domain (though certainly not required for all test scenarios)
      • Test Servers of all supported OS
        • Windows Server 2012R2
          • Requirements
            • Server Names: Srv1, Srv2, Srv3
          • All configured to join the domain (though certainly not required for all test scenarios)
    • Automated and scripted as much as possible so that test work can begin immediately upon completion
      • When it comes to processes, as automation usage increases, time efficiency increases while errors decrease.
        • Requirements
          • Utilize Windows System Image Manager to:
            • Create Autounattend.xml file for automatic installation when booting from the Windows ISOs for each Operation System
              • Windows 2012 R2
              • Windows 10
              • Windows 8
              • Windows 7
          • Utilize Deployment and Imaging Tools Environment to:
            • Install necessary driver packages for the image deployments
              • VMXNET3
            • Create the ISO installation media
          • Utilize PowerShell scripts to:
            • Deploy VMs to host
            • Configure VMs to required specifications
            • Create the domain and DNS and join all domain controllers
            • Create the DHCP service and configure it
            • Join VMs to the Domain

Step 4, summarize the list of requirements into a punchlist:

  1. Use a dedicated host or a local workstation depending on the virtualization platform of choice.
  2. Hyper-V Host: Local Windows 10 Client running Hyper-V Service
  3. VMware Host: Dedicated VMware ESXi 6.0 Host
  4. Server Names: AD1, AD2
    1. AD, DNS, DHCP
  5. Client Names: Win7, Win8, Win10
  6. Server Names: Srv1, Srv2, Srv3
  7. Utilize Windows System Image Manager to:
    1. Create Autounattend.xml file for automatic installation when booting from the Windows ISOs for each Operation System
      1. Windows 2012 R2
      2. Windows 10
      3. Windows 8
      4. Windows 7
  8. Utilize Deployment and Imaging Tools Environment to:
    1. Install necessary driver packages for the image deployments
      1. VMXNET3
    2. Create the ISO installation media
  9. Utilize PowerShell scripts to:
    1. Deploy VMs to host
    2. Configure VMs to required specifications
    3. Create the domain and DNS and join all domain controllers
    4. Create the DHCP service and configure it
    5. Join VMs to the Domain


And there you have it, a build plan for our test environment in a simple, easy to read format.  Obviously the steps listed above don’t contain all of the specifics, but as we dig in, we’ll be able to sort out the details.

Posted in Deployment, Installation, Management, Powershell, Scripting, Test Lab | Tagged , | Leave a comment

Test Lab Buildup Series – Introduction

I am in the process of revamping my entire test lab build process, and given that I know of a number of admins that still do things entirely by hand, I thought I would share the process involved since for some folks it is a fairly intimidating task to automate their world.

I actually have 3 test labs: 1 at the office, which resides on my primary workstation that runs Windows 10 with Hyper-V enabled, and another at home with a dedicated server that runs VMware ESXi 6, and I’ll be introducing a new server into that environment running Hyper-V Server 2012 R2.  My third test lab is actually on my laptop, and I use that one when I need to test out a concept when I am on slow wifi or away from an Internet connection, or in a meeting when I need to break out an answer fast.  Due to the limitations of my laptop I’m limited to a couple of low power VMs, but I’ve found that when I need those 2 or 3 VMs, I really need them, and they’ve saved my bacon a number of times.  The laptop is running Windows 10 with Hyper-V enabled.

It is my goal to demonstrate the process of building up the test lab environment on both platforms, from scratch – no WDS, no SCCM, no vCenter or VMM, no templates etc.  This means that each phase of the deployment and buildup will have both scripts available, and you can use and combine them as needed.

During this series, I will demonstrate the following:

  • Hyper-V Host Configuration
  • VMware Host Configuration
  • Server 2012 R2 Boot Image Creation w/ AutoUnattend.xml Answer File Creation
  • Server Deployment
  • Domain Controller, DNS, and DHCP Deployment
  • Domain Test Data Creation (Users, Groups, OUs, etc.)
  • Windows 10 Boot Image Creation w/ AutoUnattend.xml Answer File Creation

At that point, you will have a fully functional test environment on the platform(s) of your choice where you can test configurations and changes to your hearts content, and wipe it away and rebuild it relatively easily.


Posted in Deployment, Scripting, Test Lab | Tagged , , , , | Leave a comment

Exchange 2013 Hybrid Configuration Wizard Fails to Connect When Updating

Recently I ran into a problem preparing for the April 15th TLS Cert Update from Microsoft.  We would get to a point in the Hybrid Configuration Wizard and it would fail to connect in a spectacular fashion:

cgjvqu1

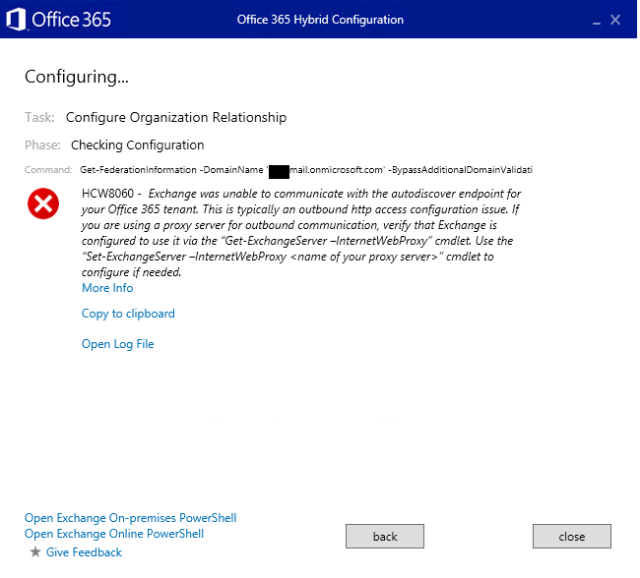
You can see that it’s saying that it can’t hit the autodiscover endpoint.  If you open up the log file, you can find the following lines by searching for “get-federationinformation”:

2016.04.08 16:18:11.627         [Workflow=Hybrid, Task=OrganizationRelationship, Phase=CheckConfiguration] START 
2016.04.08 16:18:11.657         [Session=OnPremises, Cmdlet=Get-FederationInformation] START Get-FederationInformation -DomainName '<tenantID>.mail.onmicrosoft.com' -BypassAdditionalDomainValidation: $true
2016.04.08 16:18:22.974 *ERROR* [Provider=OnPremises] Error Record: {CategoryInfo={Activity=Get-FederationInformation,Category=1001,Reason=GetFederationInformationFailedException,TargetName=,TargetType=},ErrorDetails=,Exception=Federation information could not be received from the external organization.,FullyQualifiedErrorId=[Server=nope,RequestId=nope,TimeStamp=4/8/2016 4:18:22 PM] [FailureCategory=Cmdlet-GetFederationInformationFailedException] D3A3CDB8,Microsoft.Exchange.Management.SystemConfigurationTasks.GetFederationInformation}
2016.04.08 16:18:23.000 *ERROR* [Session=OnPremises, Cmdlet=Get-FederationInformation] FINISH Time=11.3s Results=PowerShell failed to invoke 'Get-FederationInformation': Federation information could not be received from the external organization.
2016.04.08 16:18:23.050 *ERROR* [Workflow=Hybrid, Task=OrganizationRelationship, Phase=CheckConfiguration] Microsoft.Online.CSE.Hybrid.Engine.TaskException: Task 'OrganizationRelationship' failed during phase 'CheckConfiguration': Get-FederationInformation -DomainName '<tenantID>.mail.onmicrosoft.com' -BypassAdditionalDomainValidation: $true Errors Exchange was unable to communicate with the autodiscover endpoint for your Office 365 tenant. This is typically an outbound http access configuration issue. If you are using a proxy server for outbound communication, verify that Exchange is configured to use it via the “Get-ExchangeServer –InternetWebProxy” cmdlet. Use the “Set-ExchangeServer –InternetWebProxy <name of your proxy server>” cmdlet to configure if needed. ---> Microsoft.Online.CSE.Hybrid.Engine.WorkflowException: HCW8060 https://support.office.com/article/Office-365-URLs-and-IP-address-ranges-8548a211-3fe7-47cb-abb1-355ea5aa88a2 Exchange was unable to communicate with the autodiscover endpoint for your Office 365 tenant. This is typically an outbound http access configuration issue. If you are using a proxy server for outbound communication, verify that Exchange is configured to use it via the “Get-ExchangeServer –InternetWebProxy” cmdlet. Use the “Set-ExchangeServer –InternetWebProxy <name of your proxy server>” cmdlet to configure if needed.
                                   at Microsoft.Online.CSE.Hybrid.StandardWorkflow.OrganizationRelationshipTask.get_OnpremisesFederationInfo()
                                   at Microsoft.Online.CSE.Hybrid.StandardWorkflow.OrganizationRelationshipTask.NeedsConfiguration()
                                   at Microsoft.Online.CSE.Hybrid.Engine.Engine.ExecutePhase(ILogger logger, TaskPhase phase, IWorkflow workflow, ITask task, Func`3 phaseFunction, Boolean throwOnFalse)
                                   --- End of inner exception stack trace ---
                                   at Microsoft.Online.CSE.Hybrid.Engine.Engine.ExecutePhase(ILogger logger, TaskPhase phase, IWorkflow workflow, ITask task, Func`3 phaseFunction, Boolean throwOnFalse)
                                   at Microsoft.Online.CSE.Hybrid.Engine.Engine.ExecuteTask(ILogger logger, IWorkflow workflow, ITask task)
2016.04.08 16:18:23.052 *ERROR* [Workflow=Hybrid, Task=OrganizationRelationship, Phase=CheckConfiguration] FINISH Time=11.4s Results=PASSED
2016.04.08 16:18:23.053 *ERROR* [Workflow=Hybrid, Task=OrganizationRelationship] FINISH Time=12.7s Results=FAILED
2016.04.08 16:18:23.054 *ERROR* [Workflow=Hybrid] FINISH Time=17.4s Results=FAILED


This seems pretty weird given that I was running this tool on our hybrid nodes, which have the appropriate firewall rules to go to the required O365 URLs.

So I took the command from the logs, and opened up a PowerShell instance with Chris Lehr’s tool, ran the command, and got back something interesting:

PS C:\system\Install-PowerShellOptions-1.5> Get-FederationInformation -DomainName 'contoso.mail.onmicrosoft.com' -BypassAdditionalDomainValidation: $true
Creating a new session for implicit remoting of "Get-FederationInformation" command...
Federation information could not be received from the external organization.
 + CategoryInfo : NotSpecified: (:) [Get-FederationInformation], GetFederationInformationFailedException
 + FullyQualifiedErrorId : [Server=<Not-the-Hybrid-Node FQDN>,RequestId=05b20ab1-ea19-4c4c-9356-c24145e96cc8,TimeStamp=4/12/2016 6:0
 6:23 PM] [FailureCategory=Cmdlet-GetFederationInformationFailedException] D3A3CDB8,Microsoft.Exchange.Management.S
 ystemConfigurationTasks.GetFederationInformation
 + PSComputerName : <Hybrid Node FQDN>

I ended up opening a case with Microsoft about this, and the engineer and I looked for a few days thinking that it was a problem with the firewall, but all of our tests from our Hybrid node worked…except for this command.

What ended up happening was a multifaceted problem, but it has root causes in 2 things:

  1. We are on Exchange 2013 CU11 (we typically run 1 CU behind the latest to allow for community testing).
  2. We recently upgraded our firewalls to new, shiny ones.

In Exchange 2013 CU11, Microsoft introduced a feature called mailbox anchoring for remote powershell instances.  This meant that any time you connected to powershell, the account you used determined the server that the commands would actually be run from, which means that if your admin level account has a mailbox hosted on server A, and you connect to server B’s powershell, it will proxy the commands you run to Server A.  Microsoft received some feedback and by the time CU12 was released, they reversed this change.

This meant that our new firewalls, which were implemented in such a way that it locked everything down tight as could be, were not ready for outbound calls from our mail cluster that serves our on-premise users, and were failing to get the results of the get-federationinformation command, which was basically trying to get to the autodiscover-s.outlook.com url.

It took us a few days to string this series of problems together and come up with the very simple solution of allowing the on-premise cluster nodes to access the O365 urls, at which point the Hybrid Configuration Wizard worked like a champ.

We’ll be rolling out CU12 within the coming weeks to handle the mailbox anchoring issue.


Posted in Exchange 2013, O365, Powershell | Tagged , , , , | Leave a comment

Exchange 2013 Powershell Script: Check CAS Health v2

Back when we were first putting in Exchange 2013 I wanted a way to check the Client Access Server roles as we were deploying servers to make sure that they were coming up okay.  Thankfully, the Exchange 2013 team was smart enough to put in some healthcheck urls, primarily to help out the SCOM side of things.  Essentially, if the apppool and service are running right (massive “in theory” here), it will only return a 200 OK value.  Otherwise, it drops you a nice error.

I ended up writing a script to go out and take a server name and fetch these.  Then I wrote another script that would call that script and had all of our server names hardcoded in it.

Yep, I was lazy.

So now I’ve gone through the process of rewriting it to give me, and you, more options, and to be a better solution for everyone involved.  Plus it means I can be even lazier now!

I present to you, Check-CASHealthv2.ps1.  It’s fairly long, so I’ve placed it on TechNet.

In this screenshot, you can see how to specify a single server as well as the members of a particular DAG.

CHECK-CASHealthv2_00

This one shows the results of an entire Exchange organization, as well as some failures

CHECK-CASHealthv2_01

This is one of those tools that I check when I get the generic “OWA is broken” call from someone so that I can figure out the scope of any issues.

Best of all, you can pipeline the output and sort/format/etc. to your hearts content!

CHECK-CASHealthv2_02

Posted in Exchange 2013, Monitoring, Powershell | Tagged , , | Leave a comment

Exchange 2013 Powershell Script: Get DAG-wide Mailbox Statistics

While preparing for our On-prem -> O365 migration of a subset of our users, we ran across the need to gather mailbox statistics so that we could create the migration batches based on metrics.

It’s pretty simple for us to do so as the subset of users were housed on one of our DAGs, so all we needed to do was query all of the servers for all of the mailboxes, get the stats, package them up, and dump it to a CSV in a meaningful format so that we could use it both for the scoring and analysis scripts.

This script needs little preparation to run in your environment – you could actually run it against all dags with a bit of work, but I was focused on just 1 for my migration.

Modify the “$DagName” variable with your exact DAG name, save it, and run it. It will take a while to run since it’s enumerating all mailboxes and gathering data, and for larger organizations it will be a bit of a memory hog as it’s creating an array of objects in memory for its duration before it dumps them out to CSV.


$DagName = "DAG01"
$DateTime = Get-Date
$FormattedDateTime = $DateTime.Year.ToString() + "." + $DateTime.Month.ToString() + "." + $DateTime.Day.ToString() + "." + $DateTime.Hour.ToString() + "." + $DateTime.Minute.ToString() + "." + $DateTime.Second
$OutputFile = ".\$($DagName)MailboxStats-" + $FormattedDateTime + ".csv"

$Results = @()
$DAG = Get-DatabaseAvailabilityGroup $DagName -Status

foreach($Server in $DAG.StartedMailboxServers)
{
    $Mailboxes = get-mailbox -Server $Server -ResultSize unlimited

    foreach($Mailbox in $Mailboxes)
    {
        $Statistics = get-mailboxstatistics $Mailbox
    
        $output = New-Object PSObject
            
        # Add members to the PSObject
        $output | Add-Member -type NoteProperty -name Name -value $($Mailbox.name)
        $output | Add-Member -type NoteProperty -name SamAccountName -value $($Mailbox.samaccountname)
        $output | Add-Member -type NoteProperty -name UserPrincipalName -value $($Mailbox.UserPrincipalName)
        $output | Add-Member -type NoteProperty -name DN -value $($Mailbox.distinguishedname)
        $output | Add-Member -type NoteProperty -name OrganizationalUnit -value $($Mailbox.OrganizationalUnit)
        $output | Add-Member -type NoteProperty -name CustomAttribute1 -value $($Mailbox.CustomAttribute1)
        $output | Add-Member -type NoteProperty -name ItemCount -value $($Statistics.ItemCount)
        $output | Add-Member -type NoteProperty -name DeletedItemCount -value $($Statistics.DeletedItemCount)
        $output | Add-Member -type NoteProperty -name AssociatedItemCount -value $($Statistics.AssociatedItemCount)
        $output | Add-Member -type NoteProperty -name TotalItemSize -value $($Statistics.TotalItemSize -replace "(.*\()|,| [a-z]*\)", "")
        $output | Add-Member -type NoteProperty -name TotalDeletedItemSize -value $($Statistics.TotalDeletedItemSize -replace "(.*\()|,| [a-z]*\)", "")
            
        # Add the output object to the master Results object, which is returned on script completion
        $Results += $output
    }
}

$Results | Export-Csv -Path $OutputFile -NoTypeInformation

You will need to be in an Exchange 2013 prompt to run this, and have the requisite permissions in the Exchange org to access the stats.

Posted in Exchange 2013, Management, Powershell | Tagged , , , | Leave a comment

Exchange 2013 Powershell Script: Get System Wide Message Queue Status

Ran into a case where we had some delivery issues to our O365 hybrid tenant, and realized I’d never figured out a good way to take a look at all of the queues at once, and lets face it, the Exchange Toolbox Queue Viewer tool is just…sad at this point. I mean it works, but I want to know what the entire environment is doing at a glance and what our message velocity looks like. This is where the following quick script comes into play.

It’s designed to be run out of an already-connected Exchange 2013 powershell prompt, so connect using your usual method or go take a look at Chris Lehr’s blog for an awesome tool to manage your connectivity needs.

When you run it, you’ll get a screen that constantly refreshes (so you can toss it into 1 window/corner of your monitor and just let it run) and it will look similar to this:

get-messagequeuestatus_img0001

It’s pretty simple and straight forward at this time. I have it saved as “get-messagequeuestatus.ps1” in my network script repository for use from any machine.

while($true)
{
    cls
    get-date
    Get-ExchangeServer | Get-Queue | where {$_.MessageCount -gt 0} | sort MessageCount -Descending | ft -a
    sleep 10
}

I may make some enhancements in the future for color coding, requesting a certain refresh rate, etc. but for now, it’s quick and dirty and works.

Posted in Exchange 2013, Management, Monitoring, O365, Powershell, Uncategorized | Tagged , , , , , | Leave a comment

DPM 2012 R2 Search Recovery Point Action Failing to Produce Results

Recently I’ve had to switch from Backup Exec 2014 to Microsofts System Center Data Protection Manager 2012 R2 to handle our Exchange 2013 CU5 backups due the Backup Exec 2014 not supporting the Exchange 2013 SP1 + Server 2012 R2 feature of clusters without Cluster Administrative Access Points.

This went swimmingly, besides a problem with Exchange 2007 and Exchange 2013 CU5 not being able to be scanned by the 2013 CU5 ESE*.* files, until we attempted to test restores.

At the restore point, I could browse through the trees, but trying to search the recovery points for specific Exchange mailboxes failed.  Totally failed.  No response whatsoever failed.  Pulled out NetMon and looked at traffic and didn’t see the query going to the SQL server failed.

A brief call to Premier support later, and a gentleman quickly gave me the solution as he’d seen it once before:

By default, a limit of 100 connections to the SQL database is allowed, and this needed to be increased in our case.

To do so, in RegEdit, go to HKLM\SOFTWARE\Microsoft\Microsoft Data Protection Manager\DB, and append the following string:

;Max Pool Size=400

To the following 2 keys:

ConnectionString
GlobalDbConnectionString

You should end up having a connection string like so:

Integrated Security=SSPI;Initial Catalog=DPMDB_DPMServerName;Application Name=MSDPM;server=tcp:ServerIPAddr;Connect Timeout=90;Max Pool Size=400

After doing so, close any DPM Administrator Consoles you may have open, then restart the MSDPM and DPMAMService services, reopen the administrator console, and try your search again.

Posted in Disaster Recovery, DPM 2012 R2, Exchange, Exchange 2013, Installation | Tagged | Leave a comment